for my friend LeAnne. We are celebrating the impending arrival of LeAnne and Pastor James' first baby. To wish the new "parents to be" many wonderful blessings for their impending delivery from the stork, the women at our church put on a shower for her and I got the task of making her a special cake.
The theme chosen was 'butterflies'. The sugar flower decorations were inspired by Jacqueline Butler, sugar artist from La Jolla, California, owner of Petalsweets. Her beautiful and lifelike bouquets inspired me to make some flowers for the butterflies.
The top and middle tier was a chocolate cake with a Chocolate Truffle cream cheese filling.(Recipe below) The bottom tier was a vanilla cake with a lemon curd and lemon cream and fresh berries filling. The entire cake was iced with a vanilla Italian Meringue butter cream frosting.
BHG Chocolate Lover's Cake
Ingredients:
* 3/4 cup butter
* 2 eggs
* 2/3 cup unsweetened cocoa powder
* 2/3 cup boiling water
* 2/3 cup buttermilk or sour milk
* 2 teaspoons vanilla
* 2-1/4 cups all-purpose flour
* 1-1/2 teaspoons baking soda
* 1/8 teaspoon salt
* 3/4 cup granulated sugar
* 3/4 cup packed brown sugar
Directions:
1. Let butter and eggs stand at room temperature for 30 minutes. Grease and flour two 9-inch round cake pans; set aside. In a medium bowl whisk together cocoa powder and boiling water until smooth. Let cool for 10 minutes. Whisk in buttermilk and vanilla; set aside. In medium bowl stir together flour, baking soda, and salt; set aside.
2. Preheat oven to 350F. In a mixing bowl beat butter with electric mixer on medium speed for 30 seconds. Add sugars; beat until combined. Add eggs, one at a time, beating until combined after each addition. Beat in one-third of the flour mixture on low speed just until combined after each addition. Beat in half of buttermilk mixture. Mixture may look curdled. Beat in half of the remaining flour mixture, then the remaining buttermilk mixture, and finally, the remaining flour mixture.
3. Divide batter between prepared pans, spread evenly. After putting cakes into the oven, lower the temperature to 325F. Bake about 30 minutes or until toothpick inserted near centers comes out clean. Cool in pans on wire rack 10 minutes. Remove cakes from pans. Let cool on wire rack.
Chocolate truffle cream cheese filling
* 1 cup heavy whipping cream
* 8 oz chopped bittersweet chocolate (61% cacao)
* 8 oz cream cheese room temperature (Trader Joe brand or Philly's)
Place chopped chocolate in medium bowl. Bring cream just to boil in heavy medium saucepan. Pour over chocolate. Let stand 1 minute, then stir until ganache is melted and smooth. Let remaining ganache stand at room temperature to cool until barely lukewarm.
Whip up the cream cheese add in 1/2 cup of ganache mixture. Mix until mixture thoroughly incorporated (no white streaks from the cream cheese) and chill for 10 minutes.
Finishing the cake:
Place a rack inside rimmed baking sheet. Carefully run knife around pan edges to release cakes. Invert 1 cake layer onto cardboard round or bottom of 8-inch-diameter tart pan with removable bottom. Peel off parchment paper. Place cake layer on round on prepared rack. Spoon dollops of chilled ganache in the center of the cake round, then spread evenly. Invert second cake layer onto another cardboard round or tart pan bottom. Peel off parchment paper. Carefully slide cake off round and onto frosted cake layer on rack.
Pour half of barely lukewarm ganache over cake, spreading over sides to cover. Freeze until ganache sets, about 30 minutes. Pour remaining ganache over cake, allowing to drip down sides and spreading over sides if needed for even coverage and to smooth edges. Freeze to set ganache, about 30 minutes.
Saturday, May 29, 2010
Wednesday, May 19, 2010
More time to practice what I learned at the Artisan Bread class...
just when you think you know all about bread... there is just more to learn. I found that out when I attended the Artisan Bread baking class. I had always wanted to learn how to make Challah bread, last summer, I would look forward to paying $3.50 for a loaf at the local farmers market. Now, that I learned how to make the dough in class, I had struggle with shaping the loaf into a nice looking braid. Even in class, my braided loaf came out looking funny. To improve my technique, I made a full batch of dough, enough to make 6 loaves of bread and to give me enough practice to braid dough. And plenty of loaves to share with my neighbors and coworkers.
Challah Bread recipe (Cholesterol & Dairy Free)
Yield: 2 loaves at 450 grams each
516g Bread flour
23g sugar
10g salt
80g canola oil
17g fresh yeast
37g egg whites
23g pumpkin puree
200ml warm water to touch
Egg wash:
1 egg and 1 tbsp of water
For a more richer bread, replace the canola oil with butter and replace the egg whites and pumpkin puree with 1 egg.
Directions:
1. Put all ingredients in a large mixing bowl.
2. To make the dough: Combine all of the dough ingredients and mix and knead by hand, mixer, or bread machine, until you have a soft, smooth dough.
3. Allow the dough to rise, covered, for about 2 hours, or until it's puffy and nearly doubled in bulk.
4. Gently deflate the dough, and transfer it to a lightly greased work surface.
5. You may braid the challah the traditional way, into a three-strand braid. For a fancier presentation, make a four-strand braid, as follows. Divide the dough into four pieces, and shape each piece into a rough 6" log. Cover the logs with lightly greased plastic wrap or a proof cover, and let rest for 10 minutes.
6. Roll each log into a 15" rope. Cover, and let rest for 10 minutes.
7. Continue rolling the ropes til they're about 20" long; they'll shrink back to about 18" as they sit.
8. Braiding the dough, follow the video from my previous posting on how Chef Voss demonstrates how to make the 2 strand braid.
9. Gently pick up the loaf, and place it on a lightly greased or parchment-lined baking sheet. Cover the loaf with lightly greased plastic wrap or a proof cover, and let it rise till it's very puffy, 60 to 90 minutes. Towards the end of the rising time, preheat the oven to 375°F.
10. Whisk together the egg and 1 tablespoon water, and brush this glaze over the risen loaf.
11. Place the baking sheet atop another baking sheet; this will insulate the bread's bottom crust, and keep it from browning too much. Put the challah in the lower third of the oven, and bake it for 20 minutes. Tent the challah loosely with aluminum foil, and bake for an additional 25 minutes, until the loaf is golden brown.
12. Remove the bread from the oven, and place it on a rack to cool.
Reference photos and directions.
Sunday, May 16, 2010
Enjoyed taking an Artisan Bread Class ...
this weekend with my sister-in-law. It was girl's day out to have some fun baking time learning about baking artisan type breads. Our class was at the Pacific Institute of Culinary Arts located in Granville Island, in Vancouver, BC.
In the 6 1/2 hour class, Chef Alfred Voss taught us all we wanted to know about Artisan bread from making the sourdough starter, selecting ingredients, mixing, kneading, resting, proofing, shaping our doughs to baking them into breads.
We each came away from our day with 7 loaves of baked bread, a multigrain breakfast dough for baking in the morning and a small container of sourdough starter for our future bread making, along with recipes to make our breads at home. The best part is we came home with the confidence of making our own breads to feed our family and we had a fun time learning together.
In the 6 1/2 hour class, Chef Alfred Voss taught us all we wanted to know about Artisan bread from making the sourdough starter, selecting ingredients, mixing, kneading, resting, proofing, shaping our doughs to baking them into breads.
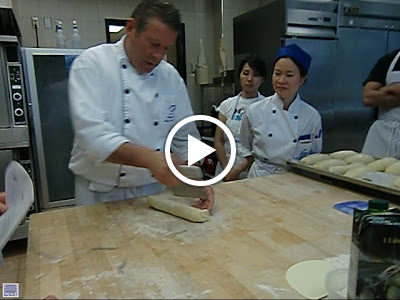 |
| From Artisan Bread Class Video |
We each came away from our day with 7 loaves of baked bread, a multigrain breakfast dough for baking in the morning and a small container of sourdough starter for our future bread making, along with recipes to make our breads at home. The best part is we came home with the confidence of making our own breads to feed our family and we had a fun time learning together.
Wednesday, May 5, 2010
Happy Cinco de Mayo!!! To celebrate this holiday,
we decided to make homemade tortillas and guacamole to go with our dinner. Hubby has been under the weather for the past two days, otherwise our plan would be to head down to our favorite Mexican restaurant, Torero's to celebrate Cinco de Mayo.
When our family has a craving for Mexican food, we would make our usual meat filling in the form of ground beef or turkey, or buffalo. If we had more time, we would make carnitas. Then head down to Torero's and pick up a dozen hot flour tortilla and an order of spanish rice and sit down to dinner.
Flour Tortilla recipe:
Ingredients:
3 cups unbleached flour
2 tsp. baking powder
1 tsp. salt
4-6 Tbsp. vegetable shortening or lard (we used butter)
about 1 1/4 cups warm water
Directions:
Mix dry ingredients in a large bowl.
Add vegetable shortening or lard, we used butter. Or use a combination of half lard, half shortening.
Use a fork or a pastry cutter to cut in the shortening or just do it the old fashioned
way and use your hands.
Next add warm water a little at a time until your dough is soft and not sticky. You do
not need very hot water.
Knead the dough for a few minutes.
Divide dough to form about 12 small dough balls. Let them
rest for at least 10 minutes, longer if you like.
Preheat your pan.
Now you can roll out the dough with a rolling pin or use a tortilla press. Dust each ball with a little flour just before you roll them out. Lay the rolling pin in the center of the dough ball and roll up, center and roll down. It is good to lift the dough and turn it. Again, rolling pin in the center and roll. Roll them out fairly thin.
Lay your tortilla on the hot pan. It takes just a few seconds to cook. Flip to the other side. When they are done, it should have lots of nice brown speckles.
Place them in a towel or a tortilla warmer to keep them warm till they are ready to be served.
Enjoy and happy cinco de mayo!
Sunday, May 2, 2010
Taking a break from cooking this weekend...
instead we had dinner at our favorite Italian restaurant, Perche'No. It was great to see Chef David and the rest of his team again. It has been many months since I had completed my internship here. We were seated at a table right above the open kitchen and could watch the flurry of activity below.
For an authentic Italian meal and a place where you are treated like family, this is the place to go.
Buon appetito!
For an authentic Italian meal and a place where you are treated like family, this is the place to go.
Buon appetito!
Subscribe to:
Posts (Atom)